What is Group Management?
Group management allows you to use our resources as trackable classes. Enroll users from your church and as the group manager you will be able to track their progress. For example, let’s say you want to use the Churchwide Evangelism & Visitation Training as a program in your church. We can set up a group for you and you can watch their progress through the course and even send encouraging notes to them. This is a fairly easy process although the Knowledge Base below contains a lot of details that might be hard to piece together before you are introduced to the system.
Does it cost to have a Group?
Yes, our ministry charges a small set-up fee for this service. Please contact us to learn the current rate.
About Your Group Management Dashboard
Your dashboard shows:
- Your Group Name
- The “Courses” to which you have subscribed
- Your Enrolled Users
- Your Group Leaders
Courses and Activities
Why are these called “Courses”?
We offer a variety of resources on this website. Some are learning courses, others are curriculum and activities, etc. The word “courses” simply refers to the items that you have chosen to make available to your group.
What if I want to offer additional Courses and Activities?
As you have seen from our website, we offer resources for individual use. These items can be bought individually or in discounted bundles. But since we have a passion to help local churches and knowing that many churches are struggling financially, we have made our resources for church use available on a donation basis.
We can automate purchases but offering resources for a donation means that we will need to manually add the new courses and activities that you desire. Most churches give a donation and then let us know what they want added to their group. Contact us at resources@threethirtyministries.org.
Before Enrolling Users
Before adding users to your group, we suggest contacting those you plan to add to let them know what is happening. People are very sensitive about the use of their information and the best practice is to always communicate in advance with a notice such as the following:
Dear Friends,
Our church will be giving you access to [state your purpose] (i.e., discipleship resources for your family, a library of Children’s Ministry resources, evangelism resources and training, student ministry resources, etc.) through ThreeThirtyMinistries. Soon you will get an email from them letting you know how to register.
You can learn more about this ministry at ThreeThirtyMinistries.com. Watch for the email invitation coming soon.
We are excited to offer these new resources. Please let me know if you have any questions.
Website Security
Is this website secure?
Yes, our site is protected by an SSL certificate as indicated by the lock button in the navigation bar at top. All personal information, including email addresses, is encrypted and secure.
How will personal information be used?
You can see our Privacy Policy at ThreeThirtyMinistries.com/privacy-policy. In brief, we value the privacy of your users and do not share or sell any personal information. They can receive emails from our website that you can send through the Group Management dashboard. Some emails are also automated with certain courses and activities and sent for instructional and encouragement purposes. Our ministry will also occasionally email your users with relevant information concerning the activities in which they are involved. There is an unsubscribe button on every email communication that comes directly from our ministry (and not because of their enrollment) that they can use to opt out of communications.
Frequently Asked Questions
Can we Subdivide our Group by Category–i.e., one for children’s ministry, one for families, one for youth ministry, etc.?
At this time, the answer is no. We cannot currently subdivide groups under the same account. You can ask for multiple groups to be created for your church. This would allow you to enroll people into certain sections without giving them access to everything and allow you to assign group leaders to each part to more easily administrate their areas. For example, your youth minister could be the group leader for the Youth Ministry area where only youth and youth leaders are enrolled. Another person might be over the children’s ministry group, etc. This allows you to have multiple groups for specific areas in your church although they won’t all appear under the same account.
Enrolling Users
It is best to open the Group Management Dashboard in another window so you can see what is being explained below.
What is the number of Users and Users remaining?
You will see the number of users allowed in your group and how many spots are currently being used. By default groups are set up for 50 users that are a part of your church or organization. If you need or want more, just let us know.
Using the List of Users
All of your enrolled users will be listed and categorized by status.
- Click the their email address to send an email using your native email.
- Status is categorized by Not enrolled, Not started, In progress and/or Completed. (These are explained more below.)
Adding a New User
Press the “Users” button above the list. From the dropdown, you can:
- Add users one at a time
- Add multiple users
- Upload users via a CVS file
- Email Users
- Download Keys
Adding Users One at a Time
When you click the Users menu, you can choose between adding one user or adding multiple users. If you select Add one, a form appears with two options:
- Add and invite user: Enter the user’s first name, last name, and email address to add them to a group. Once you click the Add User button, an email is sent to the user letting them know that the course is available for them. The user is added to your list of users in the group and their status is set to Not Started.
- Send enrollment key – PREFERRED METHOD: Enter the user’s first name, last name, and email. An email invitation with an enrollment key will automatically be sent to them. Once that user registers and redeems that key, they take up a spot in your group, are enrolled in the group and can begin the group activities or courses.
We recommend adding new users by sending an enrollment key. It is easy, fast and you get a confirmation for each added user.
STEP 1 – Press Add One
STEP 2 – Choose the “Send the Enrollment Key” option
STEP 3 – Enter first name, last name and email. Press “Add User”. That’s it!
The new user will automatically get an email similar to the following:
[Your Group Name] is inviting you to join their group at ThreeThirtyMinistries.com.
ThreeThirtyMinistries is your source for creative discipleship resources. Our goal is to help people know Jesus Christ and share His life and love with people of all ages.
To accept your invitation, click the link below:
ThreeThirtyMinistries.com/my-groupEnter the following enrollment key on the registration form to activate your account:
[Enrollment Key]Enjoy, and welcome.
Jesus Lives!
ThreeThirtyMinistries
The users you invited will simply enter their enrollment key and they are automatically enrolled in your group and in all the courses that you’ve selected.
Adding Multiple Users
You can add multiple users at one time by either filling out the form that pops up when you press Add Multiple or add users in bulk by uploading a CVS file. Users added to this form will receive an invitation email. Instead of using the multiple users form, we recommend adding users one at a time. Our experience is that less human error mistakes are made this way and you receive a confirmation of success for each new user.
Adding Users in Bulk
The Upload Users form has options similar to those described above, with one major difference. When uploading a CSV file, you can choose not send an email to the list of users you are uploading. You might want to do this if you plan to distribute enrollment keys to your users some other way.
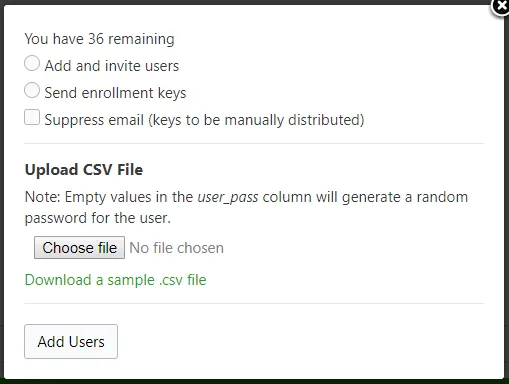
For the bulk upload to work properly, a CSV file formatted with the following column order and headings must be used: user_email; user_pass; first_name; last_name. CSV files that have incorrect formatting of email addresses, column names, etc will not be uploaded. You can download a sample file here: group_management_user_upload (.CSV file, 74 bytes). If the user_pass cells are blank, a random password will be used, but the column heading should still be included.
Tip: CSV files created and saved from some versions of MS Excel for Windows can sometimes add special characters that prevent the file from being uploaded. Platforms like Google Sheets work well with the bulk upload function and tend to avoid formatting issues found with various spreadsheet programs.
How do I Remove Users from a Group?
To remove users from a group, select the users you would like to remove from the Enrolled Userlist, and a Remove User(s) button will appear. Click on the Remove User(s) button. You will be prompted to confirm your action.
Test It Out
Add yourself as a user using a different email address. This way you can see the invitation email that will be sent to the people in your church when you add them.
Downloading Group Keys
To download a full list of enrollment keys to be used for manual tracking, reporting, and distribution, simply click Users > Download Keys and you will begin downloading a CSV file. This list is the current list of unassigned keys for that group. This list is updated when the number of users is initially set for the group and when additional users spots are added or removed from the Group.
Emailing Group Members
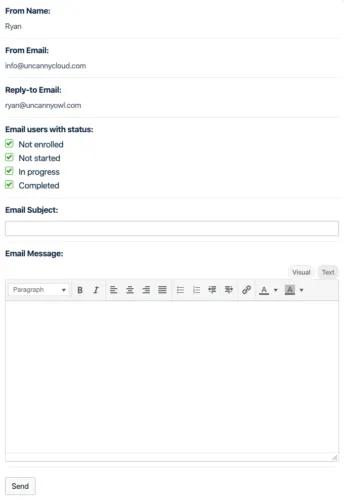
Group Leaders can easily email all members of their group based on their course status (Not enrolled, Not started, In progress and/or Completed). Clicking Users > Email Users brings up the email group members interface.
Emails sent via this interface use the Group Leader’s name as the From Name, the Group Leader’s email address as the Reply-to Email, and the From Email address is from ThreeThirtyMinistries since our website is sending it. This is to reduce the likelihood that the emails are flagged as spam. Members are sent the email via BCC, so group members will not see each others’ email addresses.
Adding & Removing Group Leaders
Adding Group Leaders
The lower section of the Group Management page is your Group Leaders list, and this list also has buttons located above it for adding, or sometimes removing, Group Leaders. Similar to the Enrolled Users list, the Group Leaders list displays the current Group Leaders by first name, last name, and email.
Adding more Group Leaders to your Group is even easier than adding users. Click the Add Group Leader button. Fill out the first name, last name, and email address of the person you would like to add. If you enter the email address of an existing user, the form will not alter the First Name and Last Name fields of that user, but will add them as a Group Leader, and send them a welcome email. If the user you added as Group Leader is new, they will be sent a different email welcoming them to the site and the Group.
Adding new group leaders gives them the same rights and privileges that you have. They will be able to add and remove users, etc. This is great for ministry assistants but be careful to whom you give this privilege.
Removing Group Leaders
To remove a Group Leader, select the users you would like to remove from the Group Leaders list, and a Remove Group Leaders(s) button will appear. Click on the Remove Group Leaders(s)button. You will be prompted to confirm your action.
Group Leaders cannot remove themselves from the Group Leaders list. This must be done by another Group Leader.
User Status
In order to track and manage your groups, as a Group Leader, it is important to consider the various ways that the status of a user, the number of spots in your group, and enrollment keys change as users and Group Leaders are added and removed, and relative to the progress of users through group courses.
When groups are created, it generates an enrollment key for each spot that is set for a group. Whenever a new user or a new Group Leader is added to a group by sending them an enrollment key, they are expected to trigger their enrollment by redeeming the key. Once they do their status is changed from not enrolled to Not Started. Once they begin a course, their status is changed to In Progress.
Please take a close look at the following table that outlines user status and the status of enrollment keys.
| GROUP MEMBER STATUS | DESCRIPTION | REDEMPTION KEY STATUS |
|---|---|---|
| Not Enrolled | An enrollment code was sent to the specified email address. | Available |
| Not Started | The user has enrolled but not yet started any courses | Available |
| In Progress | The user has started at least one of the group’s courses | Used |
| Completed | The user has completed all courses assigned to the group | Used |
Adding More Spots for Users and Courses to an Existing Group License
As you have seen from our website, we offer resources for individual use. These items can be bought individually or in discounted bundles. But since we have a passion to help local churches and knowing that many churches are struggling financially, we have made our resources for church use available on a donation basis.
We can automate purchases but offering resources for a donation means that we will need to manually add the new courses and activities that you desire. Most churches give a donation and then let us know what they want added to their group.
Feedback
We value your feedback. Your ideas and suggestions help us make this website better.
Questions or Issues?
If you have searched our Knowledge Base for answers and still have questions, please feel free to contact us at resources@threethirtyministries.org or by phone at (405) 326-8197.
Follow Us:
Share these resources: